I started playing with photography a few months ago. I have soon realized that I needed a good tool to organize my photo archive, which was growing larger and larger. I have started using Adobe Lightroom and I find it an essential tool for managing my archive in all phases of the photography workflow, from importing to developing and exporting. It took me a while to study the software and develop a personal workflow, but in the end it was well worth the effort.
Here is my current Lightroom workflow, optimized for iPhone 5 shoots. It’s probably going to evolve in the future with new camera equipment.
1. Import
For the import phase, I have created a user preset with the following settings:
- Organize the import by date, having one folder per day in the year. I don’t have so many folders in a year by now, so this arrangement is fine. If I had more folders (i.e. more days of shooting) it would be useful to organize folders in two levels, by month and day.
- Add copyright metadata to each photo.
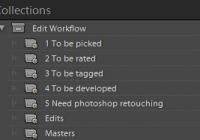
- Add the following keywords to the imported photos: 1 to be picked, 2 to be rated, 3 to be tagged, 4 to be developed. I will use these keywords later in workflow, to filter all the new photos for various tasks. Notice that you can specify keywords while importing files, or directly inside a metadata preset (the option I prefer).
- I leave Build previews to standard cause I’m working only with jpegs.
After the import, I will rename the folders and add some words after the date to describe the shooting and make it easier to find a particular folder. I can decide to merge two or more folders if they contain photos of the same event.
2. Organize
During the import phase, I added some keywords to the imported photos. These tags are useful for selecting the photos in each phase of the workflow. Often, the photos are organized or developed long time after the import phase, and it could be difficult to remember which photos are waiting to be processed. With tags, I can pick easily all the photos not yet processed.
The keyword list panel can be used to easily filter photos by workflow tags. Notice in the image below that I have grouped these tag inside a _Workflow category, starting with an underscore to make sure it appears always at the top of the keyword categories.

Here are the steps that I follow:
- I show all the photos tagged as To be picked. In this step I’m choosing which photos to pick and which to reject. I usually switch to loupe view (E button) and hide all the toolbars (shift+tab), or go to fullscreen (F button) and check all the photos to flag. When I’m in doubt on two or more similar photos, I can switch to the compare view (C button) or the survey view (N button). Depending on the shooting, it could be better to choose only the photos to pick (if there are a lot of similar photos or a lot of bad photos) or choose only the photos to reject (if the most part of the photos have good quality). I use the keyboard shortcut P for picking a photo and X for rejecting a photo. I’m keeping the caps-lock enabled during this task; in this way, when I flag a photo with the P/X buttons, lightroom moves to the next photo. If I want to go to the next photo without tagging, I can simply use the right arrow. At the end of this task, I delete the rejected photos by hitting ctrl+backspace. If I decided to flag only the photos to pick, I can turn the unflagged photos to rejected with the refine photos command (ctrl+alt+R), and then delete the rejected photos with ctrl+backspace. At this point I can select all the photos and remove the To be picked tag (just uncheck the check in the keyword list panel).
- Now I show to photos tagged as To be rated. Here I repeat a process similar to the previous one. I use the keys from 1 to 5 to rate each photo. I can use 0 to remove the rating and the arrows to navigate. At the end of the task I remove the To be rated tag from all the photos.
- Finally I show the photos tagged as To be tagged. Here I prefer to switch to the grid view, and use the painter tool to easily paint a tag to several photos. I maintain a tag taxonomy with many hierarchical levels, trying to keep all the tags well ordered. I remove the tag at the end as done previously.
3. Develop
The fourth workflow tag contains the photos tagged as “To be developed”. In this step I select every photo and switch to the develop view (D button). Here I usually start with an auto tone, just to see if I like the result. Then I can manually adjust each setting.
If I want to create different edits of the same photo (b&w, color, multiple crops), I will create some virtual copies of the photo. In this way I don’t waste disk space, because the file won’t be duplicated. Lightroom will stack by default virtual copies with the original.
Some useful shortcuts in this phase are:
- \ to toggle the before and after.
- O button during crop for cycling the crop grid overlay (thirds grid, golden ratio, golden spiral, …).
- Shift+O during crop for cycling the crop grid overlay orientation.
- Double click a slider name to reset value.
- Alt+click (or double click) a group name to reset all its sliders.

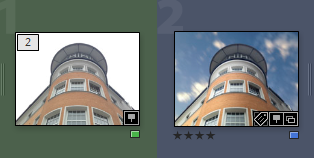
During this phase I can use color tags to mark photos which need to be retouched in photoshop. I have created a custom color label set for this purpose.
In my custom set I use these colors:
- Yellow color for photos that need retouching in photoshop.
- Green color for photos retouched in photoshop (the original files)
- Blue for master files, TIFFs with layers.
After finishing lightroom developing, I can remove the “to be developed” tag and I’m ready for the fifth step.
I’ve created a virtual collection to select all photos flagged with the yellow color, i.e. photos to be retouched in photoshop.
To open a photo in photoshop, I use the Ctrl+E shortcut and select the option “Edit a copy with lightroom adjustments” in the popup dialog. After finishing the retouching, I will save the photo in TIFF format with embedded layers and zip compression to keep a low file size. When you save your photo in photoshop, lightroom will automatically import it in library and stack it with the original. If you don’t see the imported photo (it could not work depending on software version), you can synchronize the folder and manually stack the edited and the original photo. Finally I will tag the original photo with the green color and the master TIFF file with the blue color.
The last two smart collections in my workflow folder select the master files (blue tagged photos) or the edits (green and blue tagged photos).
4. Publish
The publishing phase of my workflow is oriented to social networks publishing. I use mainly the Flickr and Facebook publishing services wich can be found in the standard installation. There’s also a service for 500px here.
I have created two virtual collections for my publish workflow.
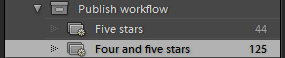
These colletions select photos by rating. In this way I can quickly navigate through my best photos and select wich one to publish.
Just before publishing a photo, I write a title into the metadata. This title will be used for the photo by the publishing plugin if you set the option “set title using IPTC Title” in the publishing plugin settings.
Shortcuts
Complete list of keyboard shortcuts
| Cycle through the thumbnail modes in grid view | J |
| Cycle forward / backward through Lights Out modes | L |
| Enter Library Compare view | C |
| Enter Library Loupe view | E |
| Enter Library Survey view | N |
| Enter Library Grid view | G |
| Open selected photo in the Develop module | D |
| Show/hide side panels | TAB |
| Show/hide all panels | Shift-TAB |
| Set star rating | 1-5 |
| Remove star rating | 0 |
| Flag photo as a pick | P |
| Flag photo as a reject | X |
| Refine photos | Ctrl+Alt+R |
| Delete rejected photo(s) | Ctrl + Backspace |
| Reset a slider | Double-click slider name |
| Reset a group of sliders | Alt-click group name |
| Reset all settings | Ctrl+Shift+R |
| Cycle info overlay | I |
| Show/hide info overlay | Shift + I |
| Cycle Crop grid overlay | O |
| Cycle Crop grid overlay orientation | Shift+O |
| Toggle before and after while developing | \ |
External Links
- Il mio workflow con Lightroom (Alessandro Di Noia)
- The complete Lightroom workflow (Dan Morris)
- Efficient Lightroom Workflow for High Resolution Images (Nasim Mansurov)
- Complete list of keyboard shortcuts