So you have created a physics based game in Unreal Engine 4, you have put some spring models here and there and you are testing the game at 60fps in your development machine. Now you are wondering what your game physics would look like if the game run at 30fps, maybe because of a frame rate drop or a vsync clamping on a low-end machine. Then you try to make a test; you open the Unreal Engine console and type t.MaxFPS 30. Chances are that your game will run fine for some time, then it suddenly explodes. What’s happening?
Fixing Your Timestep
If you are a bit familiar with physics engines architecture and the underlying math (numerical analysis[a]), you know that the evolution of a numerical physics simulation is very tied to the timestep of each iteration; the smaller the time step, the lesser the error and vice versa. Moreover, whatever integration method your physics engine is using, there will always be a region of instability[b] for your physics model that depends on the timestep. The larger the time step, the more unstable is the system. That’s why your springs explode at 30 fps if you tune their proportional constants at 60 fps[c]. Here I’m taking spring models as an example for their wide use in game physics, but you can also experience instability when you are dealing with aerodynamic models, or in general if your system is described by the so-called stiff equations[d].
It is clear that if you want your physics to behave consistently at different frame rates, you should find a way to separate the scene rendering and the physics simulation so that the physics integration time step is fixed or at least confined below a maximum value[e]. The maximum timestep allowed for your simulation can be calculated using math (interval arithmetic[f]) or by tuning your simulation at some ideal frame rate.
The best you can achieve on Unreal Engine is a variable time step below an upper bound (semi-fixed timestep[e]); it is called substepping. But first let’s have a look at all the physics settings available in Unreal Engine 4. If you want to jump directly to the details about Unreal Engine substepping, you can skip the following sections and read here.
Fixed Frame Rate
In Unreal Engine the physics time step has always some relationship with the rendering frame rate, so the first place to look at is: Project Settings > Engine > General Settings > Framerate.
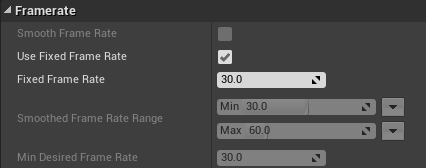
Here you can choose to set a fixed frame rate for your game. This means that the engine will always pass a fixed delta time to physics and tick functions. At the same time the engine will try to reach the desired frame rate. But what happens when there is a frame rate drop? In this case the actual frame rate will be slower than the fixed value but the delta time passed to physics will always be the same fixed value. This means that your simulation will run at a slower non-real-time speed. For example, if you set a fixed frame rate of 60fps but your game is running at 30fps because the machine is not powerful enough, then the simulation will run at half speed because in 33ms of real-time the game simulation will go only 16ms of fixed time forward.
Smooth Frame Rate
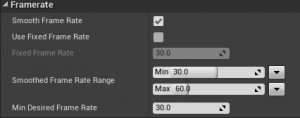
Frame rate smoothing is a way to cap the frame rate between a min and max value. It can be found here: Project Settings > Engine > General Settings > Framerate. It can be used to define the min/max acceptable frame rates. To better understand how Smooth Frame Rate works, an understanding of Vertical Sync is also needed as the two have a lot in common. More info about it here.
Max Physics Delta Time
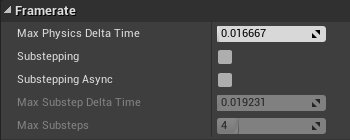
The engine settings about physics can be found here: Project Settings > Engine > Physics.
The Max Physics Delta Time property sets a maximum value for delta time during each physics iteration. This means that the physics time step is tied to the frame delta time until it doesn’t exceed the max physics delta time. When this happens, the physics time step remains fixed to this max value and the simulation starts slowing down thus becoming a non real-time simulation.
This can be useful if, for example, your game runs pretty stable at 60 fps and you know that your physics will work well above 50 fps. Then you can set a Max Physics Delta Time of 1/50sec and if you are ok with some occasional slowdowns in the simulation, you have done. But if your physics have to run at 60 fps and you want your game to run well at 30 fps, then you must use substepping.
Unreal Engine Substepping
The engine settings about substepping can be found here: Project Settings > Engine > Physics.
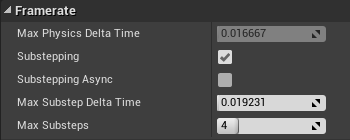
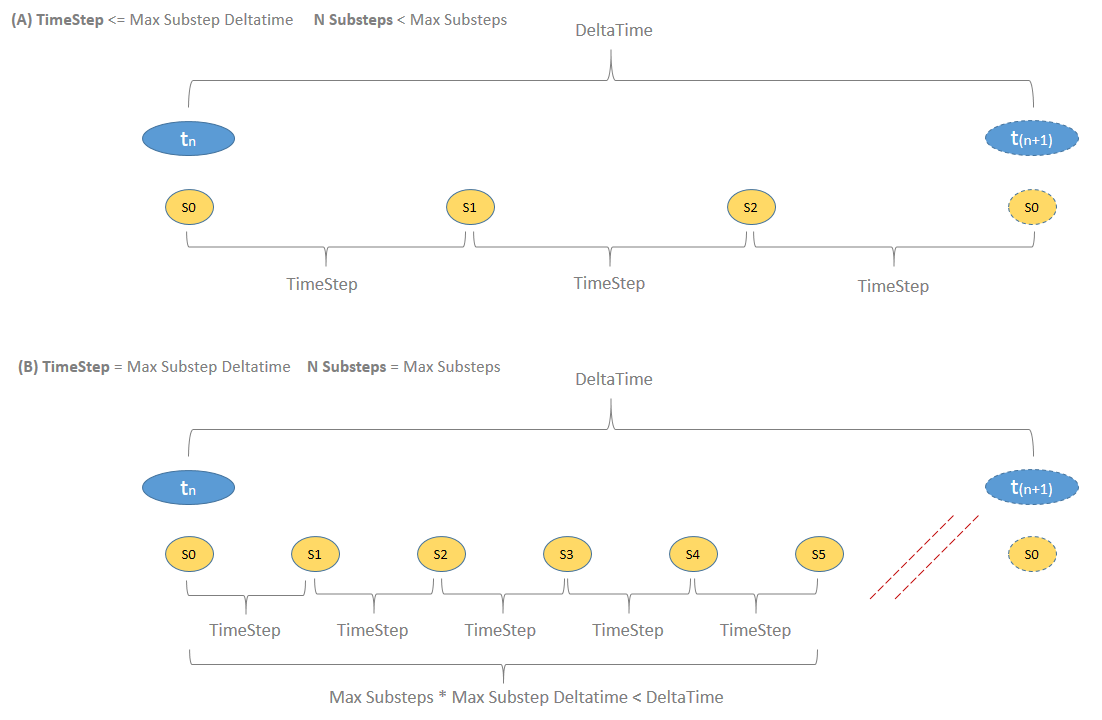
Substepping is a technique used by Unreal Engine to ensure a certain degree of frame rate independency to the physics simulation. When the frame rate drops down, Unreal will put some extra physics iterations to ensure that the physics timestep will never exceed a maximum value. You can specify this upper bound (Max Substep Delta Time) and a maximum number of physics substeps between two rendering frames (Max Substeps). Let’s say that you have set 16 ms as Max Substep Delta Time. This means that you don’t want the physics timestep to be greater than 16ms or, likewise, the physics frame rate to be smaller than 60fps. Now, if the rendering frame rate is 60 fps or above, there will be no substepping because the physics time step is lower than 16ms already. What happens when your frame rate drops below 60 fps? In this case the engine will put some extra physics substeps to ensure that the physics delta time doesn’t exceed 16 ms. So Unreal Engine will put 2 substeps of duration deltatime/2 when the fps are in the range from 30 to 60. When the rate drops below 30fps, 3 substeps of deltatime/3 will be executed. When the rate drops below 20fps, 4 substeps will be executed and so on.
The number of substeps encreases with the frame delta time until it reaches the Max Substeps value. Given the constraints of the Unreal Engine substepping, the max frame delta time allowed for a real-time simulation will be maxdt * maxsubsteps. Above this delta time the simulation will start slowing down becoming non real-time.
Let’s do some math. Let maxdt be the Max Substep Delta Time, maxsubsteps be the Max Substeps, currfps the current rendering fps, currdt=1/currfps the current frame delta time:
Target FPS = 1 / maxdt
This is the frame rate above wich there will be no substepping. It is the framerate that you should use to tune the game physics.
Limit FPS = 1 / (maxdt * maxsubsteps)
Below this frame rate there will be no more substeps and the simulation will start slowing down.
if currfps <= Limit FPS:
NSubsteps = maxsubsteps
Substep DeltaTime = maxdt
if currfps > Limit FPS:
NSubsteps = ceil(currdt / maxdt)
Substep DeltaTime = currdt / NSubsteps
Here is some pseudo-code for the semi-fixed timestep:
|
1 2 3 4 5 6 7 8 9 10 11 12 13 14 15 16 17 18 19 20 |
float remainder = 0; double currentTime = time(); while(true) { double newTime = time(); double frameTime = newTime - currentTime; currentTime = newTime; int nSubsteps = Math.ceil(frameTime / MaxDt); if(nSubsteps > MaxSubsteps) nSubsteps = MaxSubsteps; double substepDt = frameTime / nSubsteps; if(substepDt > MaxDt) substepDt = MaxDt; for(int i=0; i<nSubsteps; i++) DoPhysics(substepDt); RenderScene(); } |
The image below shows what happens when the frame deltatime is greater than maxdt * maxsubsteps (case B). In this case the sum of all the substep times is smaller than the actual deltatime and the simulation slows down.
Substepping timeline subdivision
Substepping Graph
Although the logic and the math behind the Unreal Engine substepping method are pretty simple, it can be still confusing to figure out the behaviour of the number and duration of substeps when the frame rate changes, given a certain configuration. I’ve come up with an interactive graph where you can play with different values and see how the substepping behaviour changes.
Unreal Engine 4 Substepping
As you can see in the above graph, the substep deltatime never goes above the max substep delta time but it can go a lot below it. This will guarantee that the game won’t explode (if we choose the right max deltatime) but can result in a computational overhead if we don’t pay attention to the values used. In particular, if the game is CPU bounded, the substepping mechanism could collapse and slow down the frame rate below the Limit FPS value. This because when the frame rate drops, the engine will put some extra substeps which will require more CPU cycles and, being your game CPU bounded, will slow down even more the frame rate. This chain effect will stop only when the frame rate will reach the Limit FPS value where no more substeps will be added.
The default values for the graph above show a possible configuration for a game tuned at a target physics frame rate of 40fps, and designed to run at an average speed of 60fps on high end machines and 30fps on low end ones. You can see from the graph that the physics will run at 60fps (16ms) both at 30fps and 60fps. Small frame rate fluctuations around these target rates won’t trigger any extra substep. Only when the rate slows down to 40fps we have 2 substeps at 80fps. In this way we can guarantee physics stability without any large CPU overhead.
Substep Tick Function
So you followed this article, activated the substepping and chose some suitable values for max substep deltatime and max substeps, but your game physics is still exploding and you didn’t see any substep influence when looking at your tick functions: they are still tied to the rendering frame rate and are still receiving the frame rendering deltatime. So where are these substeps?
The fact is that Unreal Engine substepping is running only under the hood and the tick functions in your actors and components are still being called at each rendering frame. This means that while the internal physics simulation is running smoother (collisions and motion integration), if your spring model is computed inside a tick function, it will gain no benefit from the substepping. In fact, if you compute the forces applied to a body every rendering frame and then the physics engine integrates those forces for N substeps at deltatime/N step intervals, the result is the same of integrating in a single step of deltatime duration. This because the forces are constant during each substep iteration.
To fix this problem you have to tell the engine to call some function in your code for each substep. There is a discussion in the Unreal Engine forum about substepping where Epic’s developers explain how to assign callbacks to be called for each substep tick[g].
Here I’m showing you a little code example of how to setup a substep callback in your project. The first thing to note is that you can access substepping only from an object that can have a rigid body, i.e. any Component extending UPrimitiveComponent. Here I’m subclassing an UStaticMeshComponent.
Here is the header code:
|
1 2 3 4 5 6 7 8 9 10 11 12 13 14 15 16 17 18 19 20 21 22 23 24 25 26 27 28 29 30 31 32 |
///////////////////////////// // MyComponent.h // Add "PhysX" and "APEX" to PublicDependencyModuleNames in yourgame.Build.cs // You will have to apply forces directly to PhysX body if you want to apply forces! If you want to read body coordinates, read them from PhysX bodies! This is important for sub-steps as transformations aren't updated until the end of physics tick #include "Components/StaticMeshComponent.h" #include "MyComponent.generated.h" UCLASS() class YOURGAME_API MyComponent : public UStaticMeshComponent { GENERATED_BODY() public: MyComponent(); virtual void BeginPlay() override; virtual void TickComponent(float DeltaTime, ELevelTick TickType, FActorComponentTickFunction* ThisTickFunction) override; FCalculateCustomPhysics OnCalculateCustomPhysics; void SubstepTick(float DeltaTime, FBodyInstance* BodyInstance); physx::PxRigidBody* PRigidBody; FORCEINLINE FVector GetCurrentLocation(); FORCEINLINE FRotator GetCurrentRotation(); FORCEINLINE FVector GetCurrentVelocity(); FORCEINLINE FVector GetCurrentAngularVelocity(); }; |
In the above code I’m overriding the main tick function wich will be called by the main rendering thread. I’m also defining a delegate OnCalculateCustomPhysics of type FCalculateCustomPhysics , a pointer to the rigid body and the SubstepTick function to be called during substepping. Finally I’m defining some utility inline functions to get position, rotation, velocities directly from the rigid body. This because body transformations aren’t updated until the end of physics tick, so you have to read them from PhysX rigid bodies to get the updated values from the last substep.
Here are all the function definitions:
|
1 2 3 4 5 6 7 8 9 10 11 12 13 14 15 16 17 18 19 20 21 22 23 24 25 26 27 28 29 30 31 32 33 34 35 36 37 38 39 40 41 42 43 44 45 46 47 48 49 50 51 52 53 54 55 56 57 58 59 |
///////////////////////////// // MyComponent.cpp #include "MyComponent.h" #include <PhysXIncludes.h> #include <PhysicsEngine/BodyInstance.h> MyComponent::MyComponent() { PrimaryComponentTick.bCanEverTick = true; PrimaryComponentTick.bStartWithTickEnabled = true; OnCalculateCustomPhysics.BindUObject(this, &MyComponent::SubstepTick); } void MyComponent::BeginPlay() { Super::BeginPlay(); PRigidBody = GetBodyInstance()->GetPxRigidBody_AssumesLocked(); } void MyComponent::TickComponent(float DeltaTime, ELevelTick TickType, FActorComponentTickFunction* ThisTickFunction) { Super::TickComponent(DeltaTime, TickType, ThisTickFunction); GetBodyInstance()->AddCustomPhysics(OnCalculateCustomPhysics); } void MyComponent::SubstepTick(float DeltaTime, FBodyInstance* BodyInstance) { // Here get your custom forces FVector f = GetForce(); FVector t = GetTorque(); // And apply them to the rigid body PRigidBody->addForce(PxVec3(f.X, f.Y, f.Z), physx::PxForceMode::eFORCE, true); PRigidBody->addTorque(PxVec3(t.X, t.Y, t.Z), PxForceMode::eFORCE, true); } FVector MyComponent::GetCurrentLocation() { PxTransform PTransform = PRigidBody->getGlobalPose(); return FVector(PTransform.p.x, PTransform.p.y, PTransform.p.z); } FRotator MyComponent::GetCurrentRotation() { PxTransform PTransform = PRigidBody->getGlobalPose(); return FRotator(FQuat(PTransform.q.x, PTransform.q.y, PTransform.q.z, PTransform.q.w)); } FVector MyComponent::GetCurrentAngularVelocity() { PxVec3 PAngVelocity = PRigidBody->getAngularVelocity(); return FMath::RadiansToDegrees(FVector(PAngVelocity.x, PAngVelocity.y, PAngVelocity.z)); } FVector MyComponent::GetCurrentVelocity() { PxVec3 PVelocity = PRigidBody->getLinearVelocity(); return FVector(PVelocity.x, PVelocity.y, PVelocity.z); } |
As you can see above, I’m binding the OnCalculateCustomPhysics delegate to the SubstepTick function:OnCalculateCustomPhysics.BindUObject(this, &UStaticMeshComponent::SubstepTick);
Then, for every main tick, inside the TickComponent function, you have to tell the BodyInstance to call the OnCalculateCustomPhysics delegate (which will eventually call SubstepTick)GetBodyInstance()->AddCustomPhysics(OnCalculateCustomPhysics);
In order to compile this code, you have to add “PhysX” and “APEX” to the PublicDependencyModuleNames array in yourgame.Build.cs module configuration file.
One big caveat when using substep callbacks is the fact that physics sub-stepping is running in a separate physics thread. This means that there are a lot of functions that you can’t call from a substep callback, because they cannot work under concurrency (many engine functions start with a (Since 4.18 Physics substepping runs in the main thread).check(MainThread) ). So if you first designed your game without substepping callbacks and then you are trying to move all your physics code into substep callbacks in a late development stage, don’t expect the task to be easy; you’ll probably find that many things won’t just work under substepping, so be prepared to a lot of refactoring.
Post Physics Tick Function
Sometimes you need to adjust something just after the physics has been evaluated in order to be sure that what you are setting will go unchanged to the rendering phase.
If you set your primary tick to pre-physics, you need to register a secondary tick function for post-physics. You have to create a struct extending the struct FTickFunction , initialize it and then register it.
Here is the header code:
|
1 2 3 4 5 6 7 8 9 10 11 12 13 14 15 16 17 18 19 20 21 22 23 24 25 26 27 28 29 30 31 32 33 34 35 36 37 38 39 40 41 42 43 44 45 46 |
///////////////////////////// // MyComponent.h #include "Components/StaticMeshComponent.h" #include "MyComponent.generated.h" USTRUCT() struct FMySecondaryTickFunction : public FTickFunction { GENERATED_USTRUCT_BODY() class MyComponent* Target; YOURGAME_API virtual void ExecuteTick( float DeltaTime, ELevelTick TickType, ENamedThreads::Type CurrentThread, const FGraphEventRef& CompletionGraphEvent) override; YOURGAME_API virtual FString DiagnosticMessage() override; }; template<> struct TStructOpsTypeTraits<FMySecondaryTickFunction> : public TStructOpsTypeTraitsBase2<FMySecondaryTickFunction> { enum { WithCopy = false }; }; UCLASS() class YOURGAME_API MyComponent : public UStaticMeshComponent { GENERATED_BODY() public: MyComponent(); FShipSecondaryTickFunction SecondaryComponentTick; virtual void BeginPlay() override; virtual void TickComponent(float DeltaTime, ELevelTick TickType, FActorComponentTickFunction* ThisTickFunction) override; void TickPostPhysics(float DeltaSeconds, ELevelTick TickType, FMySecondaryTickFunction& ThisTickFunction); }; |
As you can see above, I’m adding a pointer to a MyComponent instance inside the struct FMySecondaryTickFunction . This pointer will be used inside the ExecuteTick callback to invoke a tick function inside MyComponent .
Here are the function definitions:
|
1 2 3 4 5 6 7 8 9 10 11 12 13 14 15 16 17 18 19 20 21 22 23 24 25 26 27 28 29 30 31 32 33 34 35 36 37 38 39 40 41 42 43 44 45 46 47 48 49 50 51 52 53 54 55 56 57 58 59 60 61 62 63 64 65 66 67 68 69 70 71 |
///////////////////////////// // MyComponent.cpp #include "MyComponent.h" void FMySecondaryTickFunction::ExecuteTick( float DeltaTime, ELevelTick TickType, ENamedThreads::Type CurrentThread, const FGraphEventRef& CompletionGraphEvent) { if (Target && !Target->IsPendingKill() && !Target->IsUnreachable()) { FScopeCycleCounterUObject ActorScope(Target); Target->TickPostPhysics(DeltaTime, TickType, *this); } } FString FShipSecondaryTickFunction::DiagnosticMessage() { return Target->GetFullName() + TEXT("[MyComponent Post Physics Tick]"); } MyComponent::MyComponent() { PrimaryComponentTick.bCanEverTick = true; PrimaryComponentTick.bStartWithTickEnabled = true; PrimaryComponentTick.TickGroup = TG_PrePhysics; SecondaryComponentTick.TickGroup = TG_PostPhysics; SecondaryComponentTick.bCanEverTick = true; SecondaryComponentTick.bStartWithTickEnabled = true; } void MyComponent::BeginPlay() { Super::BeginPlay(); if (!IsTemplate() && SecondaryComponentTick.bCanEverTick) { SecondaryComponentTick.Target = this; SecondaryComponentTick.SetTickFunctionEnable(SecondaryComponentTick.bStartWithTickEnabled); SecondaryComponentTick.RegisterTickFunction(GetOwner()->GetLevel()); } } void MyComponent::TickComponent(float DeltaTime, ELevelTick TickType, FActorComponentTickFunction* ThisTickFunction) { Super::TickComponent(DeltaTime, TickType, ThisTickFunction); // Put here your pre-physics code } void MyComponent::TickPostPhysics( float DeltaSeconds, ELevelTick TickType, FMySecondaryTickFunction& ThisTickFunction ) { // Non-player update. const bool bShouldTick = ((TickType != LEVELTICK_ViewportsOnly) || GetOwner()->ShouldTickIfViewportsOnly()); if (bShouldTick) { if (!IsPendingKill() && GetWorld()) { if (GetOwner()->GetWorldSettings() != NULL && !IsRunningDedicatedServer()) { // Put here your post-physics code } } } } |
You can set a post-physics tick inside an Actor in a similar way as well.
By combining all these examples, you can easily setup a component listening to pre-physics, substeps and post-physics ticks.
Comparison with Unity 3D

Unity physics timestep is very clean and simple. While Unreal Engine is using a semi-fixed timestep, Unity uses a fixed timestep instead. For each render frame, Unity executes a number of fixed physics timesteps (each one lasting exactly a fixed timestep number of seconds) in order to consume the frame delta time:
NTimesteps = Math.floor(FrameDeltaTime / FixedTimestep)
Because the number of timesteps is an integer, there could be a remainder at each frame in the consumed delta time. This remainder is collected at each frame and added to the next frame delta time, eventually leading to the execution of an extra physics timestep when its value becomes greater or equal to FixedTimestep.
Here is some pseudo-code describing the fixed timestep:
|
1 2 3 4 5 6 7 8 9 10 11 12 13 14 15 16 17 18 19 |
float remainder = 0; double currentTime = time(); while(true) { double newTime = time(); double frameTime = newTime - currentTime; currentTime = newTime; if(frameTime > MaxAllowedTimestep) frameTime = MaxAllowedTimestep; int nTimesteps = Math.floor((frameTime + remainder) / fixedTimestep); remainder = frameTime + remainder - nTimesteps * fixedTimestep; for(int i=0; i<nTimesteps; i++) DoPhysics(fixedTimestep); RenderScene(); } |
The parameter Maximum Allowed Timestep sets a maximum value for the frame delta time (not for the timestep, which is fixed). This means that if the frame delta time is greater than this value, the physics will cap the delta time and the simulation will slow down. This is similar to what we have seen in Unreal Engine with Max Physics DeltaTime or with Max Substeps. Don’t confuse this with the Max Substep Delta Time property which is the equivalent of Unity’s Fixed Timestep. There is a bit of naming confusion here, so be careful.
Apart from the fixed vs semi-fixed model, one on the main difference between Unity and Unreal Engine is the fact that in Unity you have a simple and direct access to the physics tick through the FixedUpdate method of the Monobehaviour interface.
While the fixed timestep is the ideal model for game physics, it is not problem free. The main issue with fixed timestep is temporal aliasing caused by the accumulation of a remainder at each frame. When the remainder becomes equal or greater then the fixed timestep, an extra physics step will be executed, resulting in a little stuttering of the animation. This is more evident when the rendering framerate is not a multiple of fixedtimestep.
Another problem with fixed timestep, tied to the previous, is the fact that the main frame tick (the Update method of Monobehaviour) is often off synch with the physics tick (the FixedUpdate method of Monobehaviour). This is a well known problem for Unity developers which experience stuttering every time some object position computed in the Update is tied to another object position evaluted in a FixedUpdate. Fortunately simply moving the Update code into the FixedUpdate function will fix this problem. This is one of the problem that made Epic’s developers choose the semi-fixed timestep method for Unreal Engine; the fact that the physics timestep is not easily exposed in c++ and not at all in blueprint will make very difficult to cope with this issue in this engine[h] :
We actually had a debate about these two techniques [fixed and semi-fixed timestep] and eventually decided on semi-fixed, and here’s why:
If you use [fixed timestep] you have to use a timebank. If you want to tick physics at 60fps and you have a frame that took a little bit more than 1/60 you will need to have some left over time. Then you will tick the physics engine with the perfect 1/60 delta time, leaving the remainder for the next frame. The problem is that the rest of the engine still uses the original delta time. This means that things like blueprint will be given a delta time of 1/60 + a bit.
Example Project
I have put an example project on github here: https://github.com/gportelli/UEPhysicsExample.
Here is a video of the example running:
As you can see, there is a cube oscillating according to a damped spring model. You can change the physics parameters using the exposed editor properties. Using the default properties the oscillation will explode if you disable the substepping. The engine substepping is tuned to run at 60fps when the render frame rate is 30fps. When I disable the substepping in the video, you can see how the amplitude increases at each oscillation, eventually going to infinite. By enabling logging, you can see what is actually happening in the physics engine: a pre-physics tick, two substep ticks and a post-physics tick for each rendered frame.
References
- Substepping Documentation
- Substepping Forum Discussion
- Game Physics Articles at Gaffer on Games
- Unreal Engine Physics Example at GitHub
Notes
- Numerical Analysis [↩]
- Euler Method Numerical Stability [↩]
- Spring Physics, Gaffer on Games [↩]
- Stiff Equation [↩]
- Fix your timestep! Gaffer on Games [↩] [↩]
- Interval Arithmetic [↩]
- Physics Sub-Stepping (substep callback) – Unreal Engine Forum [↩]
- The reasons for semi-fixed time step – Unreal Engine Forum [↩]
Hi Giuseppe, very nice and useful article!
Do functions such as SafeMoveUpdatedComponent(), MoveUpdatedComponent(), etc. would benefit from all of this? I have framerate/substepping problems in my project and I’m doing a massive use of those functions in my custom MovementComponent; I just couldn’t find a way to fix all the problems…
The question is: are you running a physics simulation or a kinematic simulation? If you are using these functions in a MovementComponent, I guess you are working in kinematic and you have not enabled the “simulate physics” check for your actor, so you can’t use substepping. If you are not applying forces but you are just moving your actor frame by frame by applying a movement vector, you could manually fix your timestep at each tick with one of the methos explained here: http://gafferongames.com/game-physics/fix-your-timestep/
Basically you can execute your movement updates several times for each tick if your deltatime is larger than a minimum value. You split the larger deltatime in smaller timesteps and update your actor position one timestep at a time.
If you are running a physics simulation (the “simulate physics” check is enabled for your actor) and you want to add a substep callback to your MovementComponent, just register a substepping tick function using the UpdatedPrimitive->GetBodyInstance() to obtain the BodyInstance of your root UPrimitiveComponent (only UPrimitiveComponents like UStaticMeshComponent do have a rigid body). Follow the examples on my article to create the OnCalculateCustomPhysics delegate and passing it to the AddCustomPhysics at each TickComponent call:
UpdatedPrimitive->GetBodyInstance()->AddCustomPhysics(OnCalculateCustomPhysics);Then in your TickSubstep custom function you can do your physics.
Hi Giuseppe! I’m still having a hard time figuring this out.
I don’t use physics at all, I just have a custom MovementComponent which derives from UPawnMovementComponent, and so it doesn’t have any kind of time-step management. I delved through the UE4’s UCharacterMovementComponent and saw that there is in fact some kind of time-step management (and there’s something called Iterations, too), but it’s not easy to reproduce this stuff into my custom MovementComponent due to the massive amount of things UE4’s UCharacterMovementComponent does into one single class.
So, I got a few questions:
1) I get that I have to implement this myself, and I wanted to implement Semi-Fixed TimeStep as showed into the post you linked (Gaffer on Games’ website). But where exactly do I need to do that? I guess I have to do it in the TickComponent function of my custom MovementComponent, is this right?
2) in the TickComponent function of my custom MovementComponent, DeltaTime is passed; should I rely on that or should I calculate my own deltatime somehow?
Thanks!
1. yes, 2. yes
But I’m not sure that you really need to implement a semifixed timestep inside your component. You say that you are not using physics. Are you simulating physics with any custom algorithm? What kind of frame rate problems do you have? What happens to your object when the frame rate drops?
If you want and have time to read the full story, here it is: https://answers.unrealengine.com/questions/428359/having-an-hard-time-with-deltatime.html
Answered you here: https://answers.unrealengine.com/questions/428359/having-an-hard-time-with-deltatime.html 🙂
Thank you very much for taking the time to answer there! So, the question here is:
Would you mind implementing time-step handling in a game which does not rely on physics that much, nor does it need multiplayer/networking?
Even if it relies on physics only a little bit, the frame rate fluctuations could be evident. So the answer is: make some tests on different machines and see what happens. If the behavior is ok, then do nothing. If your game is GPU intensive with lot of drops, or if at 30 fps the animations are very different from 60 fps and this has an impact on game mechanics, then implement timestep. You have two choices, implement it by yourself inside the engine Ticks; or enable physics and substepping on an actor and then update your custom physics when the TickSubstep is called on that actor using the deltatime received in that function (much easier).
The game is GPU intensive; I didn’t notice any *relevant* frame drop to justify custom time-step handling but you know, you can never tell (the game is still in the middle of the development and this problem may show up any time). Also, I’m here to learn, so even if I won’t need time-step handling it’s a good thing to know how it works!
I forced the game to 30 FPS and it still looks good and playable; at 12 or 10 FPS the game becomes very unstable, and at 5 FPS it goes completely bogus, but who would play a game at 10 or 5 FPS anyway?
So, let me get this straight:
1) when you say “implement it by yourself inside the engine Ticks”, do you actually mean the engine tick code handling? Or a TickComponent function inside my custom UPawnMovementComponent would just do?
2) about the other option you propose (enabling physics), are you suggesting to enable physics on an actor just to catch the TickSubstep (so to make advantage of UE4’s substepping) and use its deltatime to make my pawn move/jump/fall, etc.? Is this right?
1. yes, I meant a TickComponent function
2. right
2. is a very nasty (and clever) trick! Can’t wait to try it out. Thank you very much for your help and keep up the good work!
Just out of curiosity, if I want to implement time-step inside of a TickComponent or Tick function, how should I go to do something like:
float remainder = 0;
double currentTime = time();
while(true)
{
double newTime = time();
double frameTime = newTime – currentTime;
[…]
}
I tried to get the currentTime as first thing in the Tick, then in the while loop I get newTime, but (obviously) doing frameTime = newTime – currentTime returns 0…so everything stops there…
Thanks man!
Great post! It’s a little confusing switching back and forth between FPS and delta time but otherwise your explanations are very clear. It’s a shame that’s it’s not easier to expose the callbacks in c++ and that it’s impossible in blueprint. Substepping without callbacks seems pretty useless for any simulation driven by non-uniform forces.
Hi, I understand the difficulty in thinking fps-wise versus deltatime-wise; also, depending on context, sometimes I’m most comfortable with fps or deltatime, that’s why I’ve come up with a graph based both on fps and deltatime.
As for the blueprint callbacks, I’m not sure if it is impossible at all. If you want to make some tests, you should define some BlueprintImplementableEvent (let’s call it BlueprintSubstepEvent) to dispatch from c++ at each substep. Here the only problem could be the fact that the substepping is not running in the main thread, and this could be a problem when calling blueprint functions and events. If this method works, than you can create a more generic event system using Dynamic Multicast Delegates to bind to an event of a blueprintclass from another blueprint class. This is the best you can achieve in blueprint.
Looks like Fixed Frame Rate was fixed in release 4.11.
Yes. Just updated the article and also the project to 4.15.
thanks! 🙂 I think this article will be really useful when I get to optimization
Great article, thanks a lot
The secondary tick was excelent !!
hey thanks a lot for the great article, helped me understand the weirdness of UE4 a bit more. You probably wont see this, but I’m trying to get my character movement component (no physics enabled of course) to conform to substepping. Most of my character is modeled through blueprint, so I was hoping to find any way to do this through blueprint. This is a shot in the dark but I’ve been at a wall with my project for a while and am at a loss for what to do.
If you are not using physics, you should implement a substepping algorithm on your own. You can do it in code or blueprint as well. You can find a lot of discussion about manual substepping in the comments. Basically you can perform multiple physics calculation steps instead of one only when the Deltaseconds exceeds some desired max value.
..so, how does it work now? 🙂
sorry, I meant:
“Looks like Fixed Frame Rate was fixed in release 4.11.”
..so how does Fixed Frame Rate work now, after they fixed it?
Yes, it has been fixed. I’ve just updated the section about Fixed Frame Rate. I’ve also upgrated the example project to UE4.15
fyi – looks like in 4.18 and 4.19 the substep callback runs in the game thread now….
“But what happens when there is a frame rate drop? In this case the actual frame rate will be slower than the fixed value but the delta time passed to physics will always be the same fixed value. This means that your simulation will run at a slower non-real-time speed. For example, if you set a fixed frame rate of 60fps but your game is running at 30fps because the machine is not powerful enough, then the simulation will run at half speed because in 33ms of real-time the game simulation will go only 16ms of fixed time forward.”
Are you sure? Examining the engine code the only effect using a fixed frame rate has is to cap the maximum frame rate by having the engine sleep if it could have executed a faster rate. This shouldn’t affect physics at all.
Yes, I’am. I’ve just checked on UE 4.25.
The engine code computes a wait time for the current frame. If this wait time is positive (meaning that the actual frame rate is greater than the fixed one) it simply waits; but if it is negative, the game physics slows down becoming non real time.
This is very easy to test. Just set a fixed frame rate to a value which is two times your maximum frame rate on your machine and watch your game slowing down to half speed.
The code fragment in the engine source code (UE4.25.1) is in UnrealEngine.cpp:2112 inside the function UEngine::UpdateTimeAndHandleMaxTickRate()
Wow, that’s quite shocking that Epic would allow such a major fail to be exposed like that. I can’t imagine what their rationale was. Apologies for questioning you on this.
“Frame rate smoothing is a way to cap the frame rate between a min and max value. It can be found here: Project Settings > Engine > General Settings > Framerate. This feature is meaningful when combined with hardware vsync.”
Having vsync enabled or not matters little here. The engine will perform frame time smoothing regardless of whether vsync is on or off. To say it only becomes meaningful when it’s on is misleading.
Thanks for your comment, I’ve updated the paragraph and also added a link to the new official documentation for the smooth frame rate option.
Just wanted to say thank you so much for this write up! Love all the examples + intractable graphs. I am a student working on lots of physics stuff in unreal and this is fascinating to me. I didnt know substepping was a thing before I read this. One of the most well together put info info pages ive ever seen.
Thanks!
So do you think that the FixedUpdate() from Unity is better solution than unreal
Thanks
I think that Unity solution is more elegant and straightforward. But each solution has pros and cons. Unity solution, for example, causes stuttering when the rendering framerate is not a multiple of fixedtimestep
“The main issue with fixed timestep is temporal aliasing caused by the accumulation of a remainder at each frame. When the remainder becomes equal or greater then the fixed timestep, an extra physics step will be executed, resulting in a little stuttering of the animation.”
I’ve been using Unity for a while now, and with interpolation enabled on your rigidbodies, there is no stuttering. In my opinion, Unity’s solution is way better for devs, especially since you can’t use the substeps inside blueprints in UE.
Thank you for this incredible resource. As someone trying to get a handle on UE4 after coming from Unity this was very informative.
Now, I understand this is for physics. But what if I wanted game logic to also operate using substepping? I suppose I should modify the UE4 source code to achieve this huh?
Basically to get game logic (movement calculations, interactions, etc) to be deterministic or ‘semi-deterministic’ as I like to say with a fixed tick-rate, I’d have to try to shift Actor behavior to only update/tick during the substeps so that it is decoupled from rendering. This seems much more trickier in Unreal than it is in Unity, but on the flip side, source access makes this very approachable and flexible to tackle however I want.
If you need to do some physics logic, you have to add it on a substep, cause it needs to interact with the forces and torques added on each physics substep.
If you need to do some other kind of logic in a fixed timestep way, you can implement a simple fixed timestep algorithm in your tick. There is a good example in the engine class for spring arm: USpringArmComponent::UpdateDesiredArmLocation()
Here you can see that when bUseCameraLagSubstepping is true, the internal logic is executed n times dividing the current deltatime in fixed timesteps and accumulating a remainder. Note that this is not a semi fixed timestep but an actual fixed timestep implementation.
yes indeed, I thought about making an actor that manually ticks other actors like this. I’m still brushing up on Unreal engine but I suppose I would need to make sure the “master simulation” actor is aware of all other actors in a given scene/level and then do custom ticks on them using this loop. This is kind of how I would do it with Unity but in a more explicit way with a top level Monobehaviour (aka actor). Tricky gotchas like how the movement component updates after actors tick may be the problem with this solution since those components would also need to tick in these loops per substep to get accurate calculations
So I’m confused – I looked at the Unreal Documentation now (approved for 4.26) and it clearly says the physics sub-stepping is on a separate thread (https://docs.unrealengine.com/4.26/en-US/InteractiveExperiences/Physics/Substepping/). I don’t understand why EG can’t get on top of physics time-stepping… even their own tutorial on asynchronous physics (https://docs.unrealengine.com/5.0/en-US/PhysicsFeatures/AsyncPhysics/) suggest that activating this would make the project deterministic… but I just don’t understand (given all the issues on sub-stepping) that this could possibly be true. I understand the philosophical view from a gaming perspective (games don’t need to be deterministic) – but there’s a lot of applications that would really benefit from a fixed time-step (but I guess that argument was lost a long time ago).
I think the 4.26 documentation is outdated about the substepping on separate thread, but I’m not exactly sure when they moved the substeps to the game thread.
As for the UE5 docs, the async physics is a step closer to real determinism than substepping. Here the physics runs at fixed timesteps instead of substepping which guarantees only timesteps smaller that a max value. Perfect determinism, however, is difficult to achieve here given the real time nature of the engine. Things that can ruin determinism are the sync with the game thread when the input forces are fed to the physics thread and the fact that physics tick duration may exceed the timestep. Also when you dive into the determinism rabbit hole, you may consider aspects down to the level of ieee floating point implementation on different hardware: how diffferent architectures deal with loss of precision with floating point operations.
I understand the need for determinism in applications outside the game context. I think the way to go is to modify the engine in a way that removes the real time constraint from its physics simulation. It could be as simple as running everything on a single thread with a fixed timestep regardeless of the actual frame time. This means non real time simulation (it can go faster or slower than real time depending on the simulation complexity and the machine). I’ve not checked if there is already a setting in UE for this but it is certainly an easy modification to have fixed deltaseconds.
I can’t seem to get my actor to execute more than 1 substep tick per render tick. I have the AddCustomPhysics call in the Tick() method (BeginPlay, as shown in the example above, did not work), and bound in the constructor. Playing around with the substep settings doesnt change anything.
The only difference between my example and yours is I have my movement code in the actor itself. I am expecting the substep function to call multiple times under low frame rates, but that isn’t happening.
I appreciate any help, been banging my head against a wall for a few days trying to get reasonable consistency at lower framerates and good collision, and this blog post helped a lot in my understanding in what needs to be done to fix it.. My Code:
ADrifter::ADrifter()
{
…..
OnCalculateCustomPhysics.BindUObject(this, &ADrifter::SubstepTick);
}
void ADrifter::Tick(float DeltaTime)
{
Super::Tick(DeltaTime);
Logger::Info(TEXT(“Tick! %f”), DeltaTime);
DrifterRoot->GetBodyInstance()->AddCustomPhysics(OnCalculateCustomPhysics);
….
}
void ADrifter::SubstepTick(float DeltaTime, FBodyInstance* BodyInstance)
{
Logger::Info(TEXT(” SubstepTick! %f”), DeltaTime);
}
Output @ MaxFPS=10
LogTemp: Display: Tick! 0.100000
LogTemp: Display: SubstepTick! 0.100000
LogTemp: Display: Tick! 0.100000
LogTemp: Display: SubstepTick! 0.100000
LogTemp: Display: Tick! 0.100000
LogTemp: Display: SubstepTick! 0.100000
Hi, check if your root component is a subclass of UPrimitiveComponent (like a StaticMeshComponent for example), and make sure to enable physics on it using SetSimulatePhysics(true) or via a check in the editor.
I have a USphereComponent as a root, which derives from UPrimitiveComponent, as my root component, and do have simulate physics set. Weird.
I have a pretty complex actor. There is a SphereComponent at root, with a UStaticMeshComponent attached to that, and then attached to that is numerous other classes derived from UStaticMeshComponent called UParts (user created space ships like Kerbal Space Program). Any idea if this could be causing issues? Simulating physics in general seems a bit buggy with this actor, so maybe I’ll just try out a simpler actor to see whats going wrong.
I think the problem is that you are calling the AddCustomPhysics() from the actor Tick(). You have to call it from an ActorComponent. For this reason in my code base I have created a PhysicsComponent extending UActorComponent. I add this component to the actor I want to substep and in its TickComponent I call the AddCustomPhysics() on the root component of the actor.
void UMyPhysicsComponent::TickComponent(float DeltaTime, enum ELevelTick TickType, FActorComponentTickFunction *ThisTickFunction)
{
Super::TickComponent(DeltaTime, TickType, ThisTickFunction);
UPrimitiveComponent* Root = Cast(GetOwner()->GetRootComponent());
Root->GetBodyInstance()->AddCustomPhysics(OnCalculateCustomPhysics);
}
You are very smart! Thank you for the great article.
I am working on a physics base 3D motorcycle game and Jittery Physics from Frame Drops was wiping the floor with me.
This article put me into the right direction.
If it helps anyone else I set mine up as the following for silky smooth physics :)!
Engine 4.27
Engine fixed frame rate = 60 (FPS)
Physics Max Substep Delta Time = 0.00833 (120 FPS)
Max Substeps = 4
Async checked
Thank you again, really appreciate all the hard work you put into this article.
I’m glad to be helpful. Notice that 120 fps can be pretty demanding, especially if you have a complex model and many vehicles. I was able to run smoothly with a bit more than 50. Notice also that my article is missing an important advice to help keeping your simulation stable: when applying friction forces, never allow them to change the orientation of the input velocities. In other words: friction can at most stop you, but never reverse your speed. In this case, due to undersampling, friction forces are injecting energy into the system instead of just draining kinetic energy. The rule is, when a velocity vector is used to compute a friction force, the effect of that force for a frame on the component of velocity parallel to the force, must be at most of cancelling the velocity, never changing its sign. Use this rule to cap friction forces.
Hope it can help.
Howdy Giuseppe,
I have a situation that I’m not sure if it will benefit from this or not, so I implore your expertise on the topic.
I have a trace running on tick that checks each render frame if something is being hit.
Obviously at 10 or less frames, we’re skipping traces.
I had been looking into substepping to try to get the parts that are missed. For more info, it’s tied to animation. Imagine you swing a sword. at 120 fps, no prob, all frames are done. at 5 or 10, most don’t show up and the traces fail.
So my question is:
Would it benefit from tying it to the AsyncPhysicsTick and use substepping to compute the physical location of the trace source somehow?
Currently, I just tied my logic on the AsyncPhysicsTick however the behaviour is identical as with tick. I’m thinking I’d need to use the callback method but I’m severely doubtful it would work.
Much appreciated article and have a pleasant day!